- Home
- Products
- ARM
- Frequently Asked Questions
- Managing Trials
ARM Frequently Asked Questions: Managing Trials
Storing ARM files on a shared network drive
When there are multiple ARM licensees working in the same company, it is typically convenient to store ARM files in a central place, such as a network share so that everyone can access the files.
In order to set up ARM to work from this central location, perform the following steps:
- Define a mapped drive for the network share folder, with the main folder named "ARM Data."
- Create subfolders below "ARM Data" for each study year.
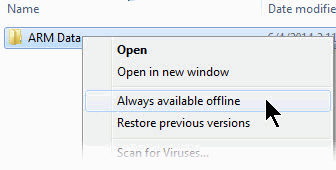
- *In Windows Explorer, right-click on ARM Data and select "Always available offline."
- In ARM, select Tools - Options, and then select the File tab (below).
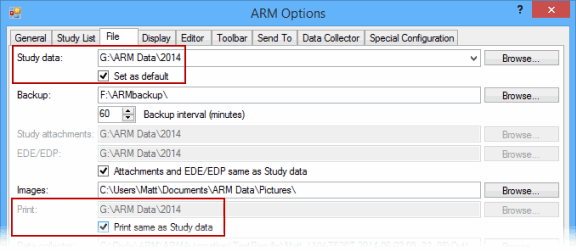
- Set "Study data" to the network share, pointing to the subfolder for the current years' trials.
- Select the "Set as default" check box below Study data as well.
- Select the "Print same as Study data" check box below the Print option, so reports are saved on the network share with ARM protocols and trials.
*By using the "Always available offline" feature of Windows, the ARM studies and reports are available when working out of the office, disconnected from the network. Windows automatically synchronizes changes next time the computer is connected to the network.
What is the purpose of the ARM Action Code header field in the Assessment Data editor?
What is the purpose of the ARM Action Code header field in the Assessment Data editor?
The ARM Action Codes field (previously named "PRM Data Type" in PRM) identifies special actions you want ARM to perform (for example, AUDPC), or to identify actions that ARM has performed (for example, TS[1]).
Press
Examples of ARM Action Codes are:
- Data Limits - enter a type code recognized by ARM to use in limiting data to a certain range. For example, P = 0 to 100.
- Non-Analyzable Data - identify treatments, replicates, or columns to exclude from the analysis on Summary reports.
- Automatic Calculations - enter an automatic calculation code such as APC for automatic percent calculation on a summary (APC = Automatic Percent Control).
- Special Formatting - format assessments as calendar dates.
- Mean Separations Test - identify a mean separation test to use per data column on a Standard Summary. For example, K05 for Tukey's at 5%.
- Transformation - identify a special transformation function such as @TTAB[1] to calculated Abbots (percent of check) from treatment means in data column one from. For transformations created from the Transform dialog in ARM, this column identifies the data transformation used to create a calculated data column. For example, TAB[1] if created from Abbott's transformation applied to data column 1, or T2 for user-defined transformation equation number 2.
What is the Treatments editor's Ingredient dialog used for?
What is the Treatments editor's Ingredient dialog used for?
The optional Treatment Ingredient dialog displays any ingredient information that is entered in the F9 validation list for treatment name. The ingredient dialog can also be used to calculate a pre-mix rate that contains a specified quantity of an ingredient.
If the Ingredient dialog is not visible in the treatment editor, display the Treatment View Options dialog by selecting Tools from the ARM menu bar, then Options and click Treatment View tab. Deselect the check mark for the “Hide ingredients dialog” option. The treatment view options also controls other settings related to the treatment editor window.
The treatment ingredient dialog displays “No ingredient information” when the cursor is positioned on a treatment line for which it is not possible to obtain ingredient information from the treatment name F9 validation list. (The treatment name field is called Entry Name, Product Name, Practice/Product, or Entry/Trt. Description on some study definitions.)
Ingredient information is entered in the comment section of the treatment name validation list. Position the cursor in the treatment name field and press F9. Any ingredient information is listed at the right side of the validation list dialog following the entries for treatment name, formulation concentration, etc.
The comment must be formatted correctly for pre-mix ingredient information (names + concentrations) to list it as an ingredient on the treatment ingredient dialog.
Items in each ingredient comment section are separated by a plus sign "+". ARM will assume that a comment in a chemical dictionary is the ingredient listing for a pre-mix if the comment is formatted as:
First ingredient name+Second ingredient name|Amount+Amount
For more details on validation list formatting, please refer to the ARM help topic "Validation List Item Format".
Why has my data disappeared in my assessment data editor?
Why has my data disappeared in my assessment data editor?
Assessment data columns may be hidden because an assessment data view has removed some columns from view. Using the Tools > Options > Assessment Data View Options dialog, ARM can hide original or calculated data columns, or hide all columns that do not contain specified data header entries. Once a view is defined, it can be cleared by quitting and restarting ARM or by selecting column choices of Both and clicking the Clear button below the Match column.
Treatments editor shortcuts
Treatments editor shortcuts
Tip: Rate Unit Shortcut - A one or two character rate unit code can be entered into the rate unit field instead of typing the entire unit or selecting a unit from the F9 validation list. The supported rate unit codes are displayed in the F9 validation list for the rate unit field, such as the letter “A” for “KG A/HA” (or “LB A/A” with US treatment units). ARM accepts a rate unit code in either the primary rate field (typically called either Dosage Unit or Rate Unit) or the alternative rate field (typically called Other Rate Unit, Transformed Rate Unit, or Product Rate Unit).
Tip: Use the quotation " key to duplicate the entire treatment line from the above entry line. Use the apostrophe ' key to duplicate the corresponding field (column) entry from above.
Tip: Use the Shift+Down Arrow while cursor is in the Treatment Number field to select the entire row, or click the right mouse button and select Copy Current Treatment line.
Assessment Data Editor shortcuts
Assessment Data Editor shortcuts
Tip: View plot data sorted by treatment by opening the plot data window for a trial, then selecting Tools - Sort By - Treatment.
Tip: When entering multi-column data, you can change the cursor order to advance across columns (plot to the right rather than plot below) using the Plot Data View feature.
For example, if you want to enter new data in columns 8, 9, and 10:
- Open the plot data editor and place your cursor in data column 8.
- Select Tools from the menu bar, select Options, and click Plot Data View tab.
- Change the cursor order option (lower left section of dialog window) to Across Columns Within Plot and enter 3 for the number of columns.
- Be sure to click OK to save the changes.
- Enter your first assessment in column 8. When you press enter, the cursor will advance to column 9, and again to column 10.
- Pressing enter in column 10 advances to the line below and places the cursor in column 8.
Specifying Non-Uniform Harvested Plot Sizes
Specifying Non-Uniform Harvested Plot Sizes
The treated experimental unit size for a trial is entered in the Trial Settings dialog, which sets the treatment area for all plots in the trial. However, there are situations where the harvested plot size may not be the same for all plots. When this occurs, a simple yield conversion using the same plot size for all plots would not be accurate for those plots with varying dimensions.
See Specifying Non-Uniform Harvested Plot Sizes (pdf) for step-by-step instructions on performing a yield conversion with non-uniform harvested plot sizes.
Leaf Wall Area Calculations
Leaf Wall Area Calculations
For a tutorial on working with Leaf Wall Area (LWA) calculations, including a description of data entry fields that must be filled to obtain all ARM-supported LWA calculations, see Leaf Wall Area Calculations (pdf).
I want to import trial EDE files into a database. What is the process?
I want to import trial EDE files into a database. What is the process?
Use the ARM Trial Database (ATD) instead.
EDE is an obsolete format with many shortcomings to transport trial information - see EDE FAQ for more information.
Describing Subsamples in Assessment Data
Describing Subsamples in Assessment Data
Many types of assessment ratings require multiple values to be recorded per plot, and is beneficial when there is a lot of variability present. These values are entered in ARM as subsamples.
Describing the assessment's subsamples involve a handful of assessment header fields, depending on the subsampling technique.
Depending on the technique, not all of these fields are necessary to describe an assessment. We will provide some examples of different assessments and how to describe them using these header fields.
Arrange blocks according to known variation
Arrange blocks according to known variation
Most trials use rectangular blocks, based on the assumption that the site variation is a known gradient. However, some trials have irregular known variation at the trial site. For example, nematode populations vary wildly, thus an initial assessment of the trial site variation is performed to understand the population. This measured variation is used to arrange homogenous blocks across the trial map.
See Arrange blocks according to known variation (pdf) for the step-by-step procedure for setting the randomization using an Excel spreadsheet.